Official Documentation

Tour Tracker
User Manual

Complete guide for tour operators: reservation management, guide assignment, earnings tracking and account administration.

Version: 1.0 Language: English Updated: April 2026

1 Introduction

Tour Tracker is a reservation and tour management platform built for professional tour operators. It automates reservation imports from email, simplifies guide assignment, and delivers complete earnings tracking — all from a single dashboard.

What is Tour Tracker?

Tour Tracker solves the core challenge faced by tour operators: the manual, fragmented management of bookings coming from multiple platforms. The system automatically monitors a connected inbox, uses AI to extract reservation data from each confirmation email, and organises everything in a centralised dashboard.

📥

Auto-Import

Extracts reservations from GetYourGuide, Viator, Civitatis and direct booking emails.

👥

Guide Management

Assign guides to tours, track availability and manage payments in one place.

✂️

Tour Splitting

Split large groups into smaller tours, each assigned to a separate guide.

📊

Earnings Tracking

Track what's been earned and what's owed — per tour, per guide, per period.

📄

Reports & Export

Generate detailed reports and export to CSV for accounting and payroll.

🔒

Secure & Private

Each client gets an isolated instance on a dedicated subdomain with SSL encryption.

Tour Tracker has two separate interfaces:

InterfaceAccessMain functions
Admin DashboardOperator & guidesReservations, tours, guides, reports, settings
Customer PortalSubscriber (operator)Usage metrics, account status, subscription management

Available Plans

PlanPriceReservations/monthGuidesSupport
Free Trial€0 / 1 monthUp to 600✓ UnlimitedEmail
Starter€50 / monthUp to 150✓ UnlimitedEmail
Enthusiast€120 / monthFrom 151 to 600✓ UnlimitedPriority
Advanced€200 / month601 and above✓ UnlimitedDedicated
ℹ️
The Free Trial requires no credit card. You get one full month with up to 150 reservations to evaluate the platform. Plan changes take effect at the start of the next billing cycle.

Requirements

RequirementDetail
BrowserChrome, Firefox, Safari or Edge (recent versions). Stable internet connection.
Email inboxA dedicated inbox for booking confirmations (e.g. reservations@yourcompany.com).
Company detailsCompany name, email address and username for registration.
Payment (paid plans)Visa, Mastercard or Amex credit/debit card. Processed securely by Stripe.

2 Getting Started

How to register for Tour Tracker, activate your account, and access the admin dashboard for the first time.

Registration & Plan Selection

1
Visit the Tour Tracker website and select a plan. Use the plan calculator on the pricing page: enter your monthly reservation volume and it will recommend the right plan.
2
Click "Get Started" (paid plans) or "Start Free Trial". The account creation form will open.
3
Complete the registration form:
FieldDescriptionRequirements
EmailPrimary email address for your accountValid email format
Company NameYour tour operator company nameAt least 2 characters
UsernameUnique identifier used to log in3–120 characters; letters, numbers, underscore
PasswordSecure account passwordMin. 8 characters, at least one letter and one number
Confirm PasswordPassword verificationMust match the password field
4
For paid plans: you'll be redirected to Stripe to enter card details. Tour Tracker never stores your card information.
5
After registration you'll receive a confirmation email. Your account will be in Under Review status while your instance is being set up.

Account Activation

The Tour Tracker team will set up your instance within 24–48 hours. During this time your account will show one of these statuses:

StatusDescription
Pending PaymentPayment has not yet been processed or verified by Stripe.
Under ReviewThe team is setting up your instance. Wait for the activation email.
ActiveYour instance is ready. You can access the admin dashboard.
Grace PeriodTemporary access after expiry. Update your plan or payment to continue.
DeactivatedAccount has been deactivated. Contact support to reactivate.

First Login

1
Go to your personalised subdomain: yoursubdomain.tourtracker.me. You'll see the TourTracker login screen.
2
Enter your Username and Password, then click "Sign in".
3
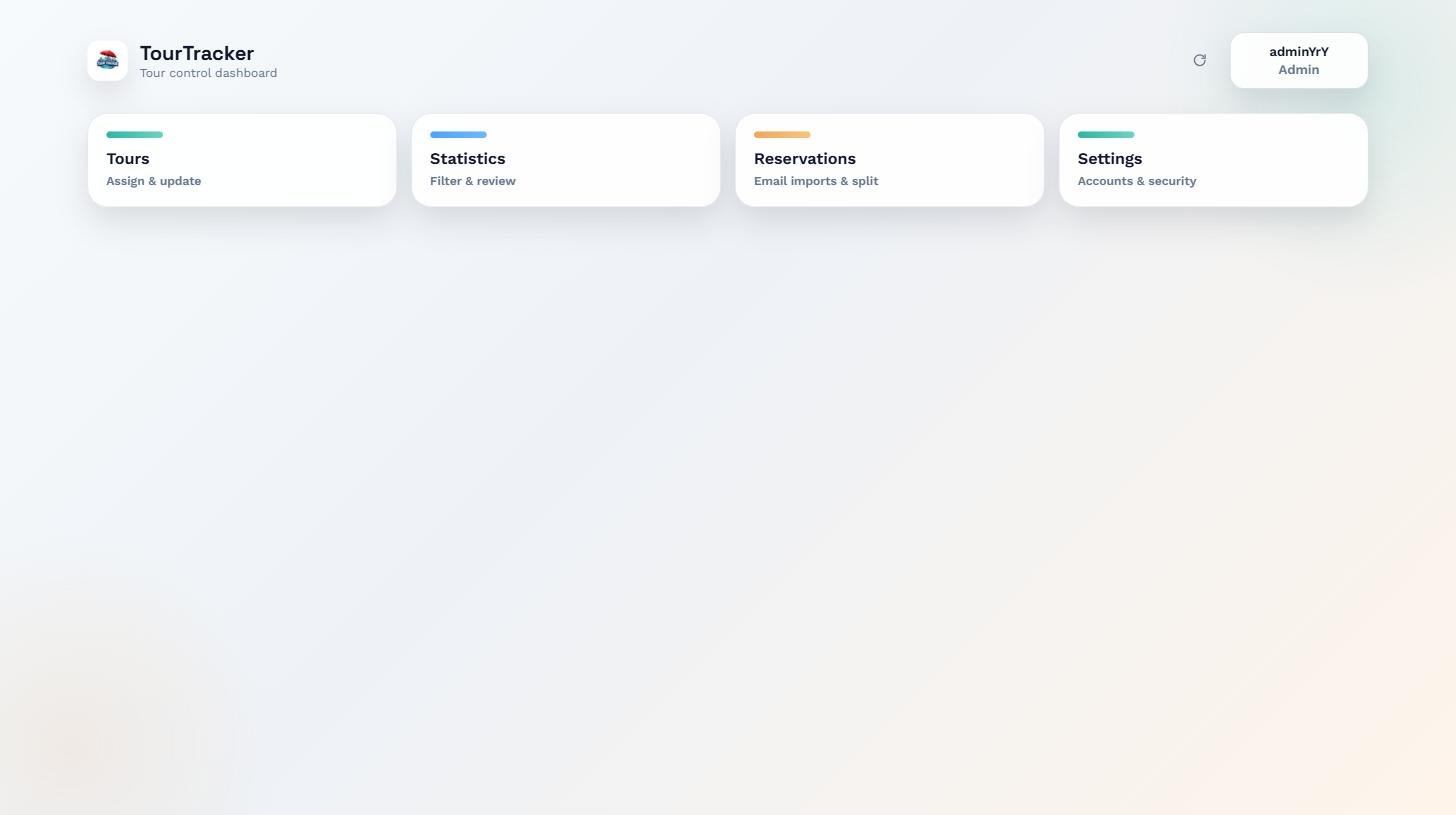
You'll land on the main dashboard with four module cards: Tours, Statistics, Reservations and Settings.
Main dashboard with four module cards
Main dashboard — four module cards visible to an admin user: Tours, Statistics, Reservations and Settings.
💡
The refresh button (circular arrow icon) in the top bar reloads all data without a full page reload. Use it to see the latest imported reservations.

Gmail Forwarding Setup (Required after activation)

Once your account is active, the next critical step is to configure the email forwarding from your Gmail inbox to your Tour Tracker reservation address. This is what enables auto-import of bookings.

Open the Gmail Forwarding Setup wizard from the dashboard. The wizard walks you through six steps using progressive tabs:
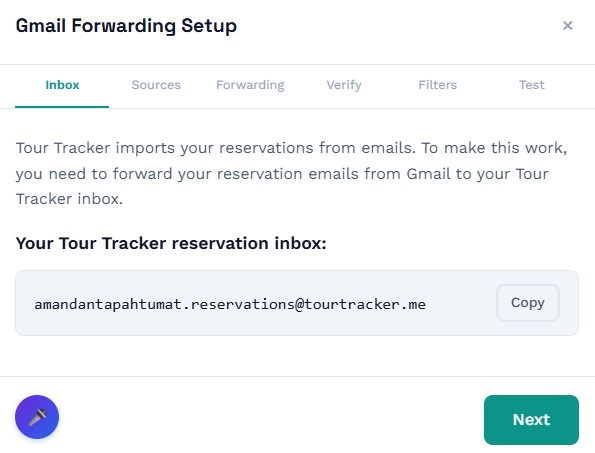
Gmail Forwarding Setup wizard window
The Gmail Forwarding Setup wizard — six tabs at the top guide you through the setup. The purple AI assistant button in the bottom left answers questions in real time during the process.
TabWhat it does
1. InboxShows your unique Tour Tracker reservation inbox address (e.g. yourcompany.reservations@tourtracker.me). Copy it — you'll forward bookings to this address.
2. SourcesList the booking platforms you receive emails from (GetYourGuide, Viator, Civitatis, etc.) so Tour Tracker knows what senders to expect.
3. ForwardingStep-by-step instructions to add the Tour Tracker address as a forwarding address in your Gmail settings.
4. VerifyConfirm the verification code Gmail sends to complete the forwarding setup.
5. FiltersCreate Gmail filters that auto-forward booking confirmations from each source to Tour Tracker.
6. TestSend a test booking to verify the full pipeline (Gmail → forwarding → import → dashboard) works end-to-end.
🤖
The AI Assistant (purple icon in the wizard) is available at every step. Click it to ask any question in plain language — for example "Where do I find Gmail forwarding settings?" or "Why isn't my verification code arriving?". The assistant responds in real time, contextualised to the step you're on.
⚠️
Until you complete the forwarding setup, no booking emails will be imported automatically. You can still create reservations manually from the Reservations module, but auto-import is the primary value of Tour Tracker — don't skip this step.

3 Admin Dashboard

The admin dashboard is the operational hub of Tour Tracker. From here you manage reservations, tours, guides, statistics and account configuration.

Overview

ModuleAccessDescription
ToursAdmin + GuideAssign guides, confirm attendance, register participants and calculate payments.
StatisticsAdmin + GuideFilter earnings by date and guide, view charts and export CSV reports.
ReservationsAdmin onlyView, filter, import and manage all reservations in the system.
SettingsAdmin + GuideConfigure profile, import sources, payment rates and user accounts.
ℹ️
When there are tours awaiting a guide assignment, a red badge appears on the Tours card showing the count of pending tours.

Reservations

The Reservations module lets you view and manage all imported reservations. It is accessible to administrators only.
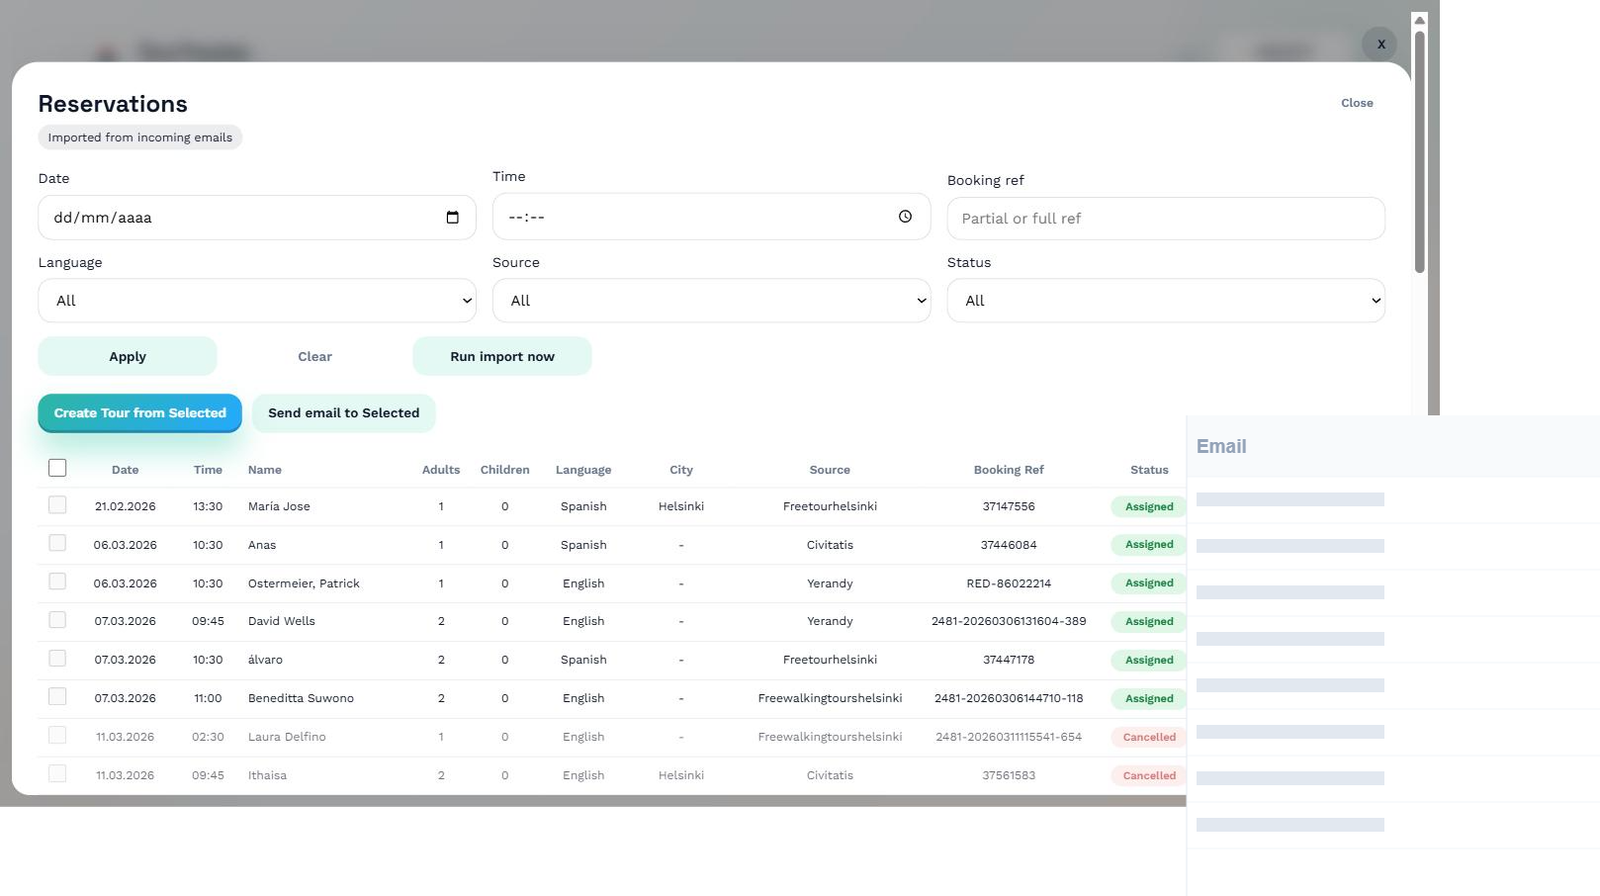
Reservations table with filters and action buttons
Reservations module — filter bar at the top, full reservation table below with status badges, and bulk-action buttons (Create Tour, Send Email, Run Import).

Filters

FilterDescription
DateFilter by tour date.
TimeFilter by tour time.
Booking RefSearch by booking platform reference code (partial or full).
LanguageFilter by customer's preferred language.
SourceFilter by booking origin (GetYourGuide, Viator, Civitatis, etc.).
StatusFilter by reservation status.

Reservation Statuses

StatusDescription
UnassignedImported and awaiting inclusion in a tour.
AssignedAdded to a tour with a guide assigned.
CancelledThe reservation has been cancelled.
Needs ReviewThe system detected an anomaly. Requires manual review.
No ShowCustomer did not show up for the tour.

Importing Reservations from Email

1
In the Reservations module, click "Run Import now".
2
The system scans unprocessed emails in the connected inbox and uses AI to extract: date, time, group size, tour type and customer details.
3
Extracted reservations appear in the list with status Unassigned.
⚠️
You must configure incoming email sources in Settings → Incoming Emails before automatic import will work. Sources that are disabled will not be processed.

Creating a Tour from Selected Reservations

1
Select the desired reservations using the checkboxes. Use the header checkbox to select/deselect all visible rows.
2
Click "Create Tour from Selected". The Tours module opens with those reservations pre-loaded as participants.

Tours

The Tours module is used to create, manage and complete tours. Admins have full access; guides see only their own assigned tours.
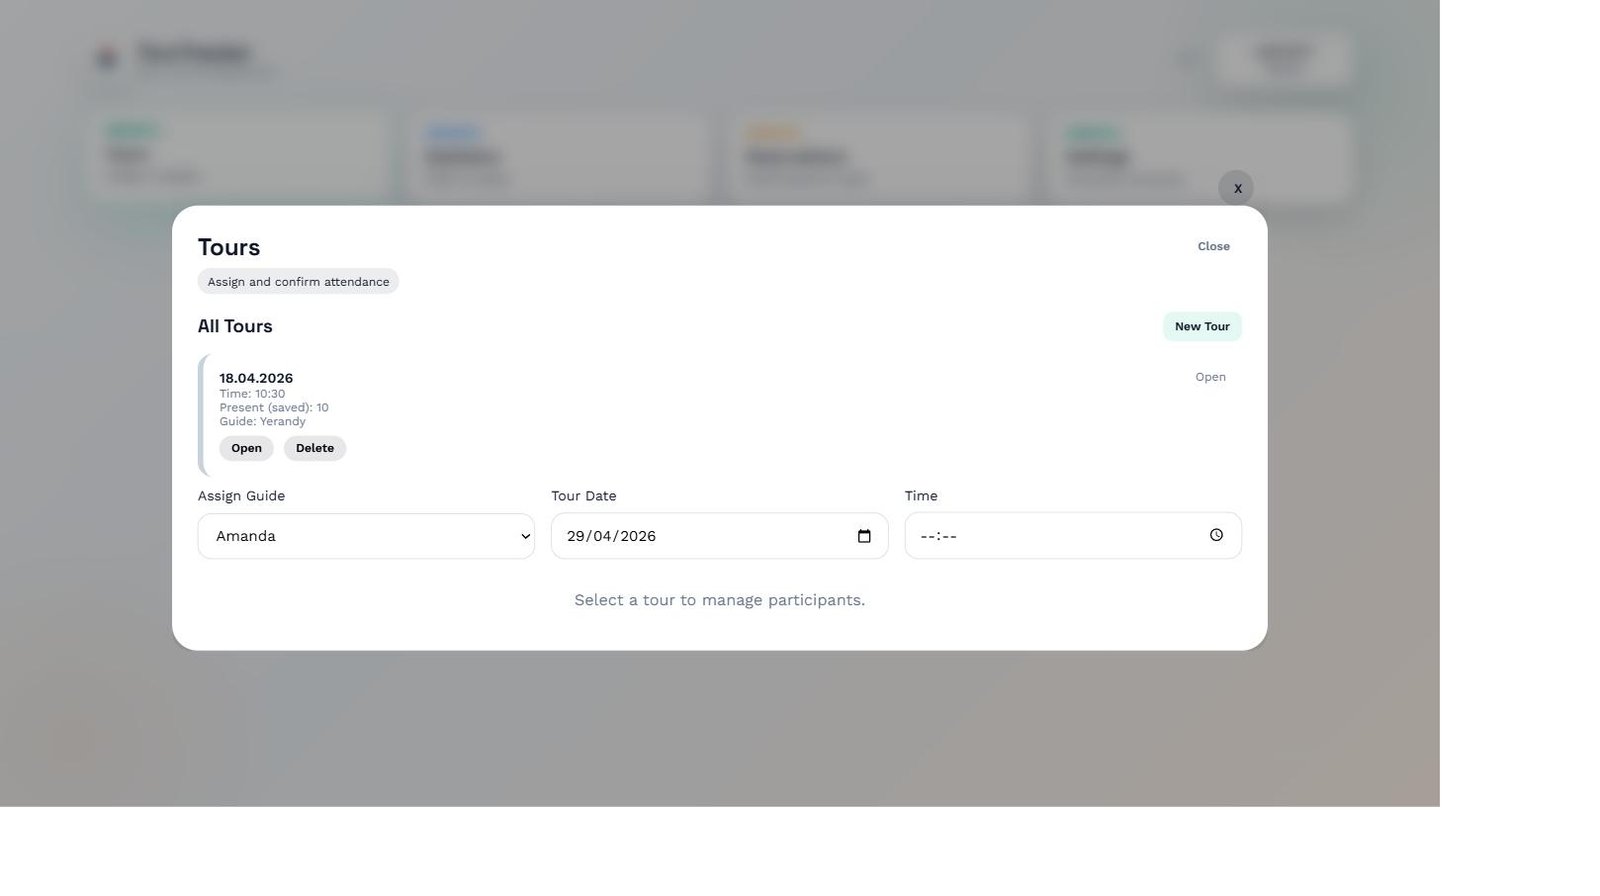
Tours module showing the tour list and creation form
Tours module — the queue on the left lists existing tours; the form on the right is used to assign a guide, set the date/time, and manage participants.

Creating a Tour (Admin only)

1
Click "New Tour" at the top of the tours queue.
2
Fill in the tour form fields:
FieldDescriptionRole
Assign GuideSelect the guide responsible for this tour.Admin only
Tour DateDate on which the tour takes place.Admin + Guide
TimeTour start time.Admin only
Total Earned (EUR)Total amount collected on the tour.Guide only
Guide NotesOptional additional notes about the tour.Admin + Guide

Managing Participants

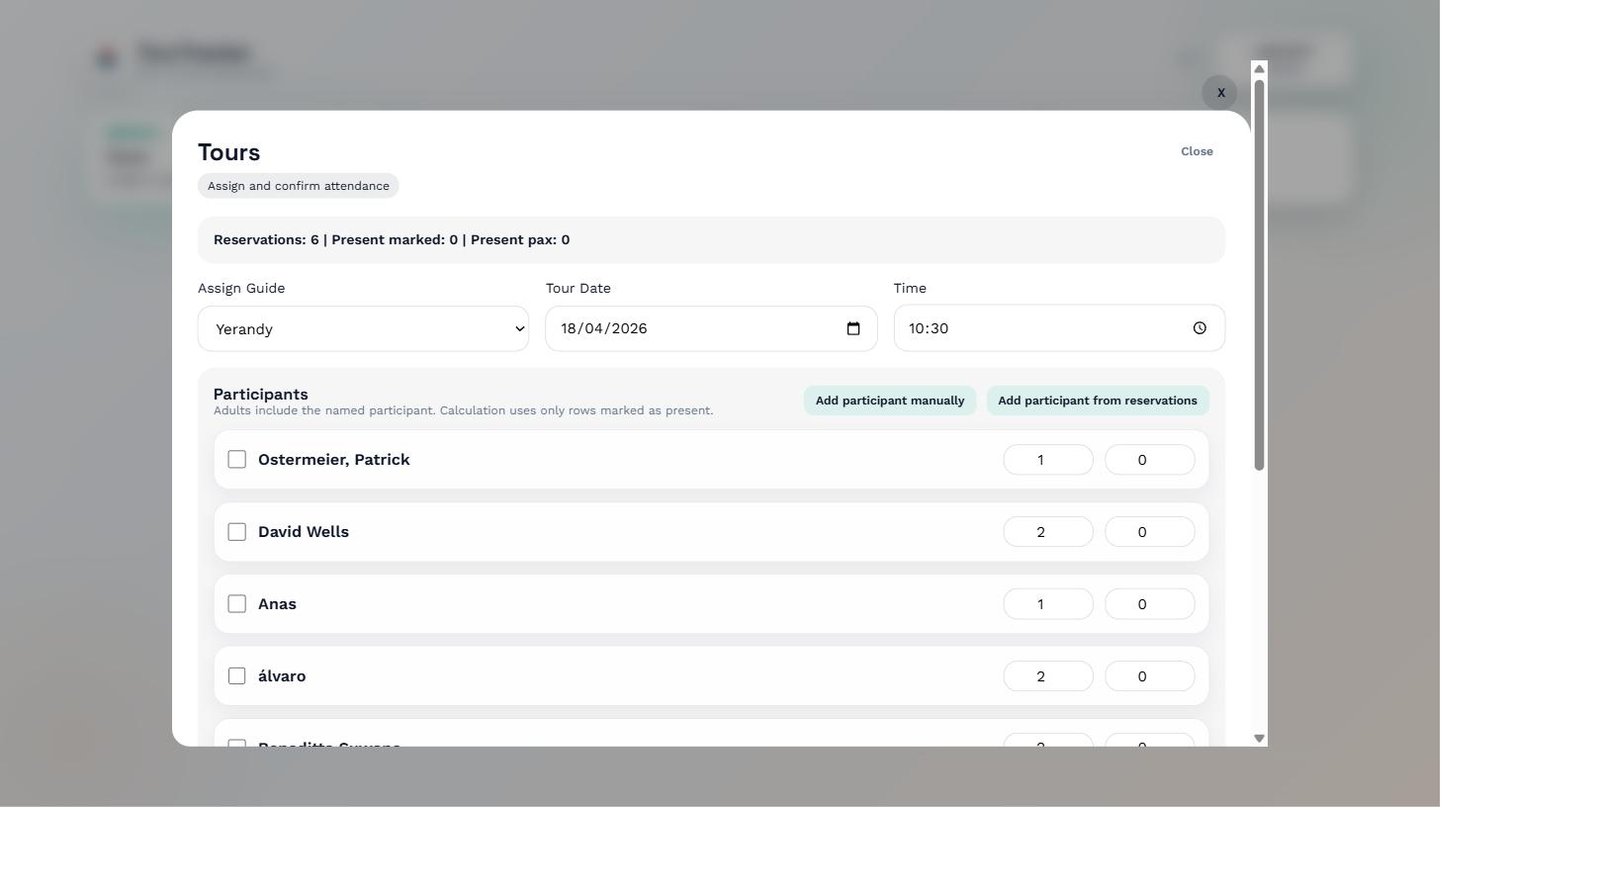
Tour detail showing participant list with present checkboxes
Tour detail view — participant rows with checkboxes to mark attendance. Adults and children counts are entered per row. The summary banner shows totals for the selected tour.
1
Add participants using "Add participant manually" (free text) or "Add participant from reservations" (picker from existing reservations).
2
For each participant, check the Present box to mark attendance, and enter the number of adults and children. Only rows marked present are counted in the payment calculation.
3
The system automatically calculates the amount due to the guide based on configured rates.
ℹ️
Amount due = (Adults × adult rate) + (Children × child rate). Rates are configured in Settings. Only participants marked as present are counted.

Tour Splitting

When a group is too large for a single guide, the system can split it into sub-tours. Admin only.

1
While creating or editing a tour, enable the "Split Tour" toggle in the split setup panel.
2
Select 2 or more guides from the available list.
3
3
Designate a lead guide as the primary responsible for the split batch.
4
Save. The system automatically creates the sub-tours and assigns them to the selected guides.

Tour Drafts

If you start creating a tour and need to leave the module, the system will offer to save a local draft. When you return to Tours, a prompt will ask whether to restore it. You can discard it anytime with "Clear draft".

Guide Management

Guides are managed from Settings → User Management. Guides do not need separate accounts — the admin creates and manages their profiles from within the dashboard.
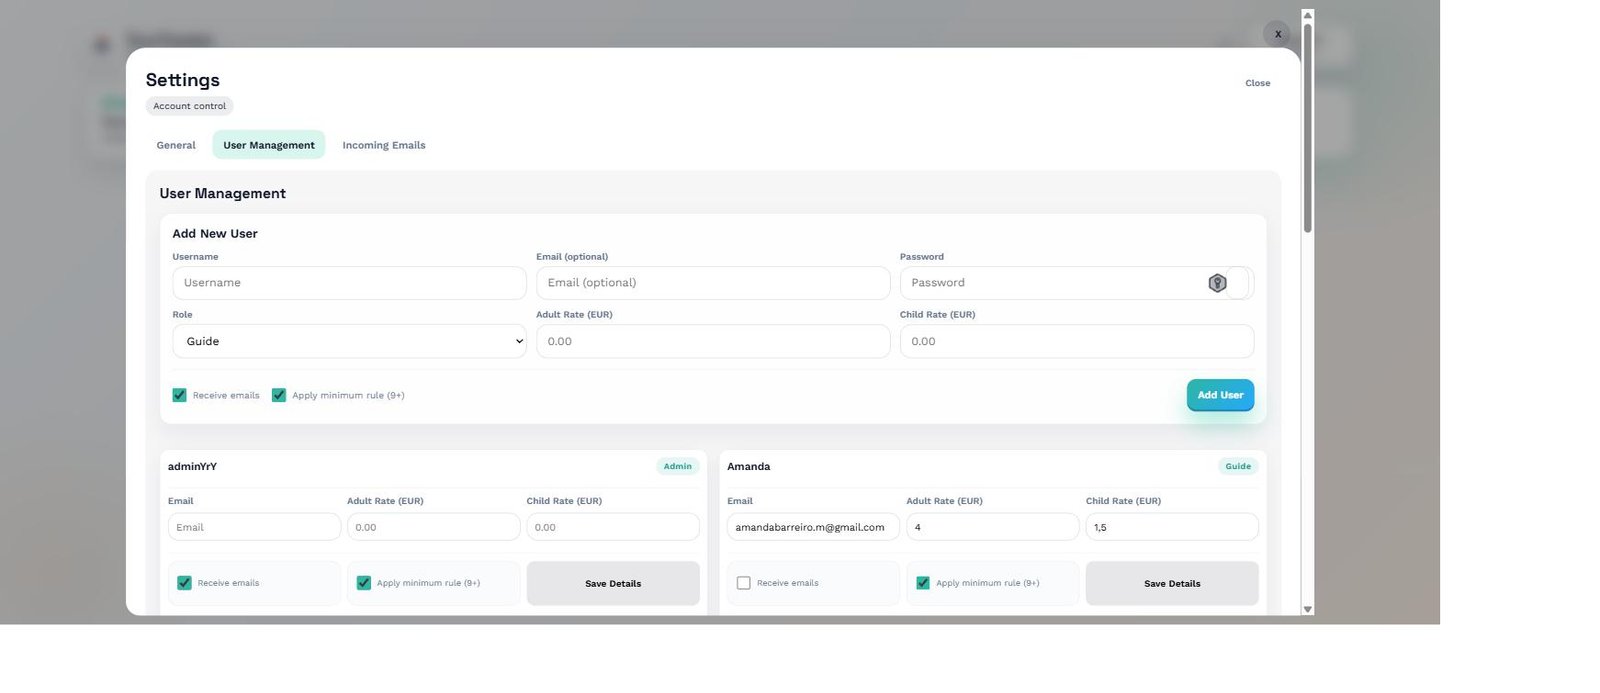
User Management settings panel
User Management — add new users with username, email, password, role and per-user rates. Existing users are listed below with editable details and role badges.
1
Go to Settings → User Management.
2
Fill in the new user form: username, email (optional), password, role, adult rate and child rate.
3
Click "Add User". The guide can now log in at the same subdomain with their credentials.
💡
Each guide can have individual rates (adult/child) set per user, overriding the global rates. Enable "Receive emails" so the guide gets notified automatically when a tour is assigned.

Statistics & Earnings

The Statistics module has three tabs: Filters, Export and Insights.

Filters tab — Earnings overview
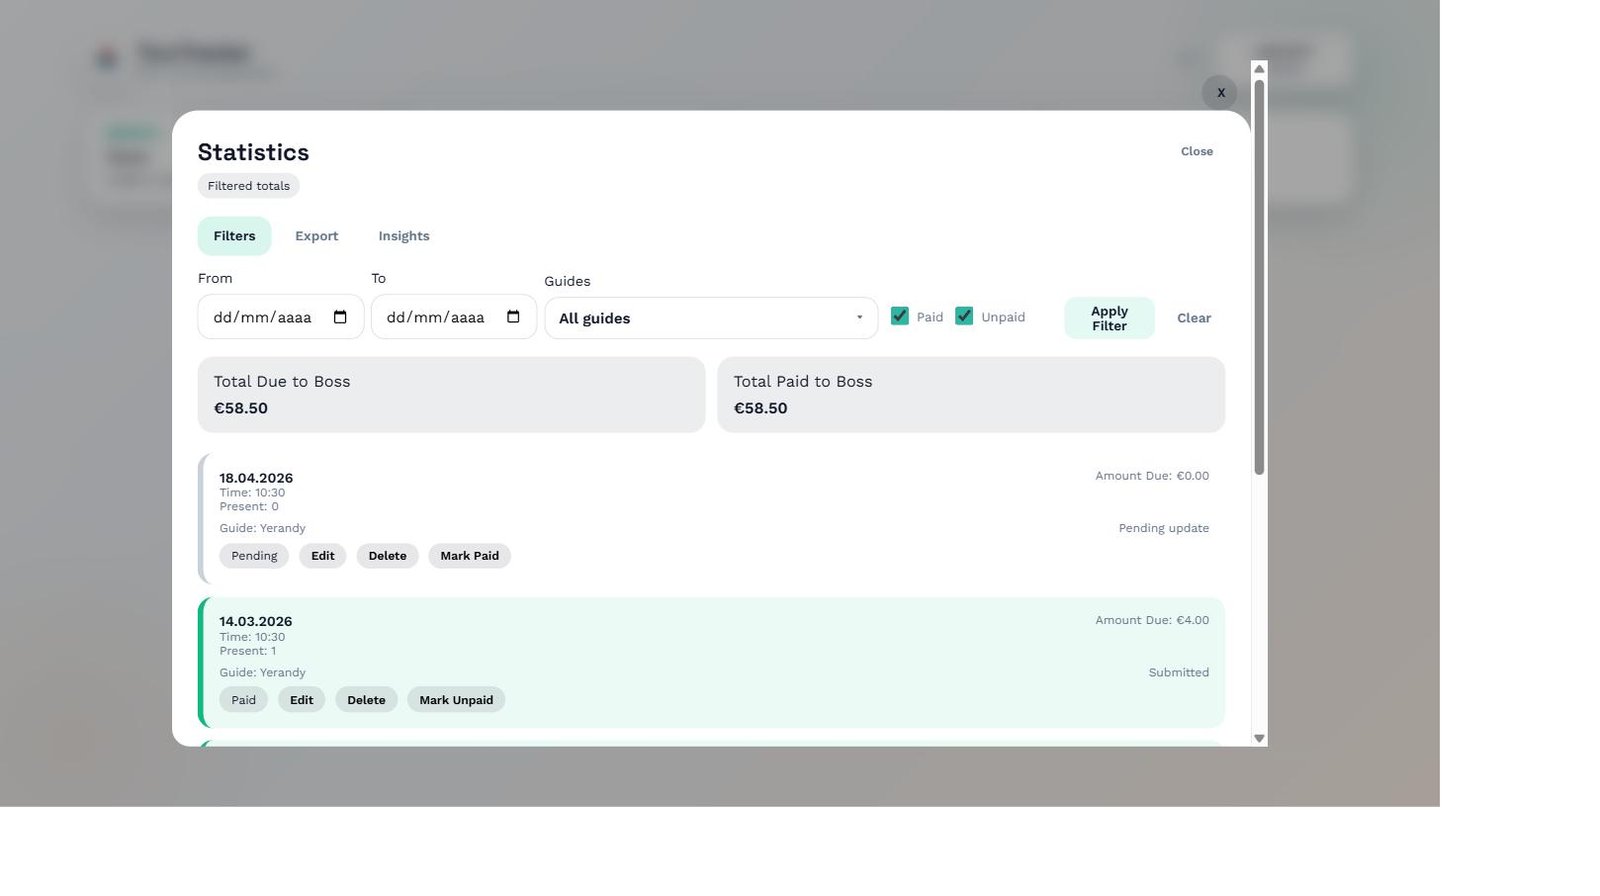
Statistics Filters tab showing totals and tour list
Statistics — Filters tab. Set a date range, choose guides and toggle Paid/Unpaid. The summary shows Total Due and Total Paid. Each tour row shows amount due and payment status, with Edit, Delete, Mark Paid / Mark Unpaid actions.
Filter / MetricDescription
From / ToDate range to filter tours.
GuidesFilter by one or more guides (admin only).
Paid / UnpaidShow only settled or outstanding tours.
Total Due to BossSum of amounts owed to guides in the filtered period.
Total Paid to BossSum of amounts already settled.

Export tab — CSV download

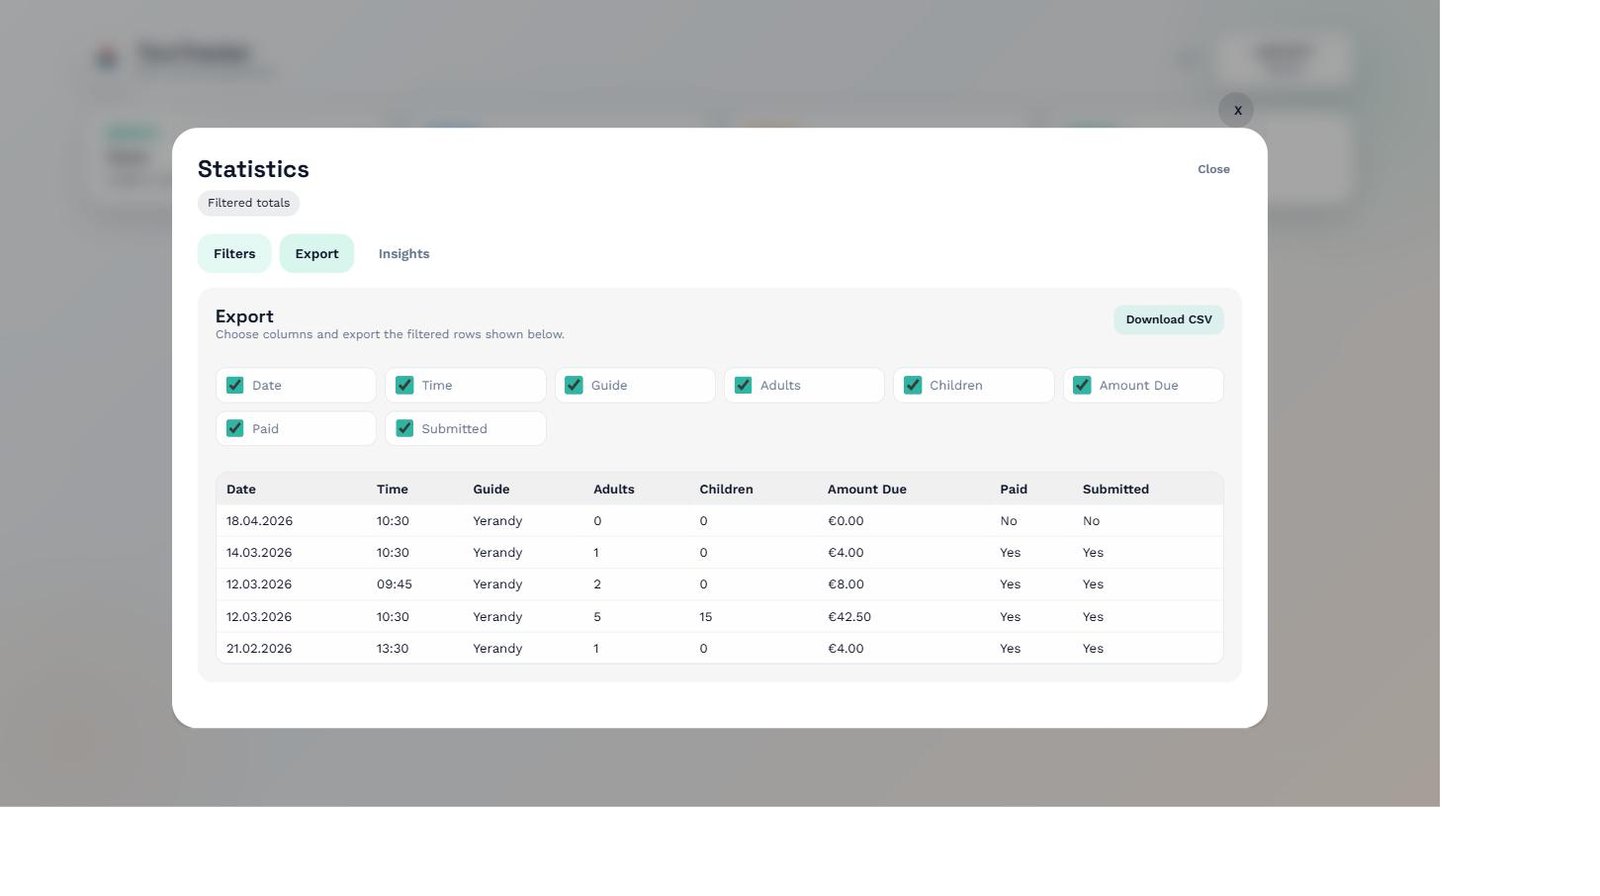
Statistics Export tab with column selector and preview table
Export tab — choose which columns to include (Date, Time, Guide, Adults, Children, Amount Due, Paid, Submitted) and preview the data before downloading as CSV.

Select the columns you want in the export, review the preview table, then click "Download CSV". The file is compatible with Excel, Google Sheets and accounting tools.

Insights tab — Charts (Admin only)
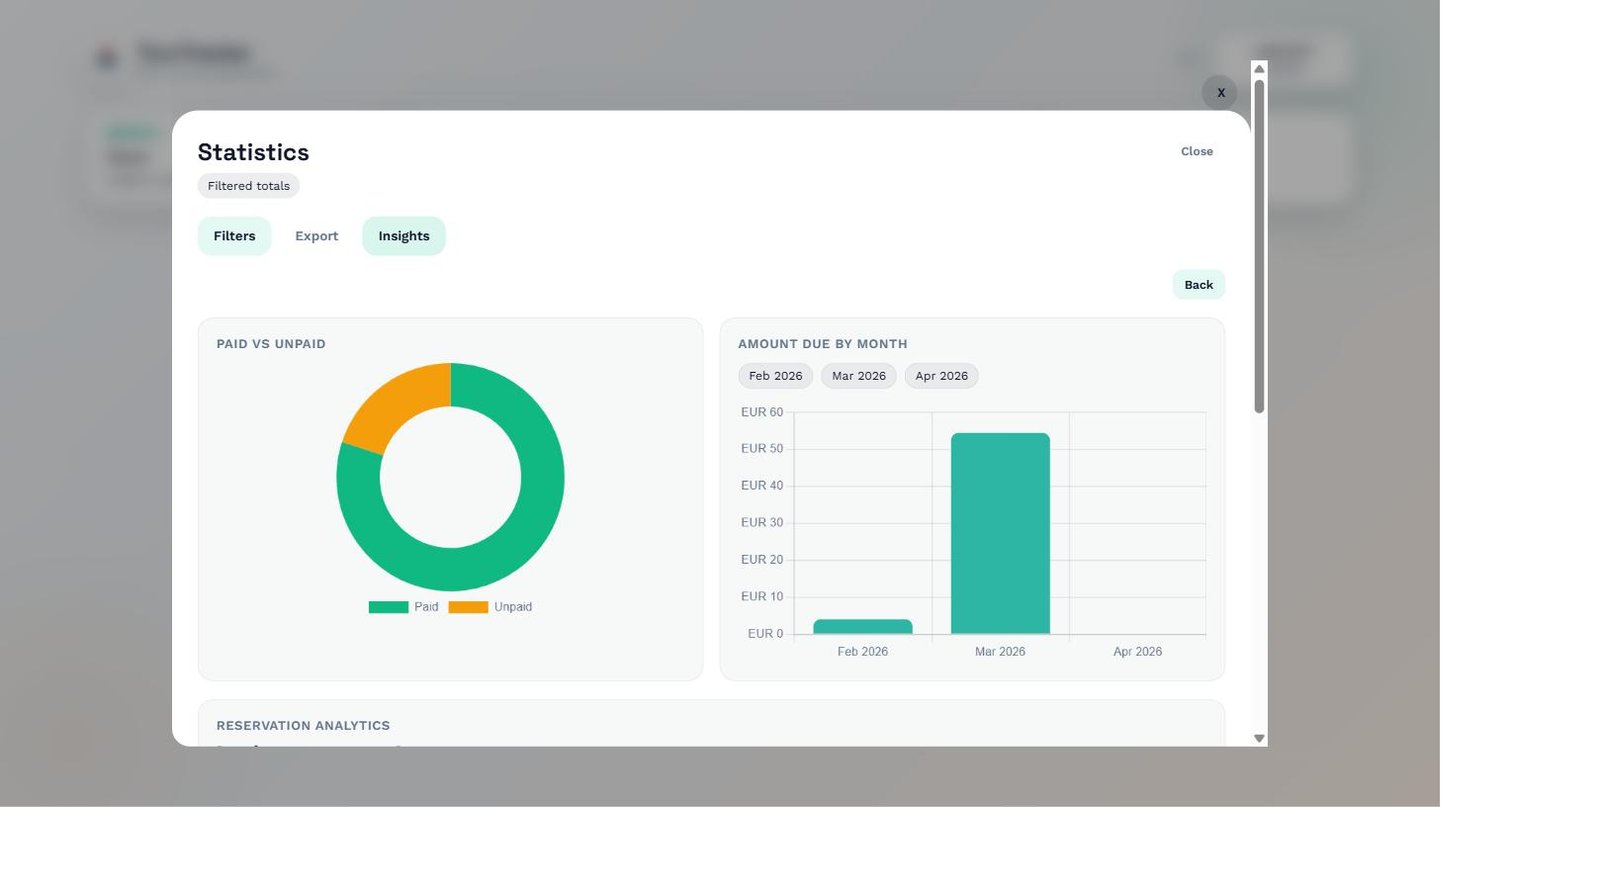
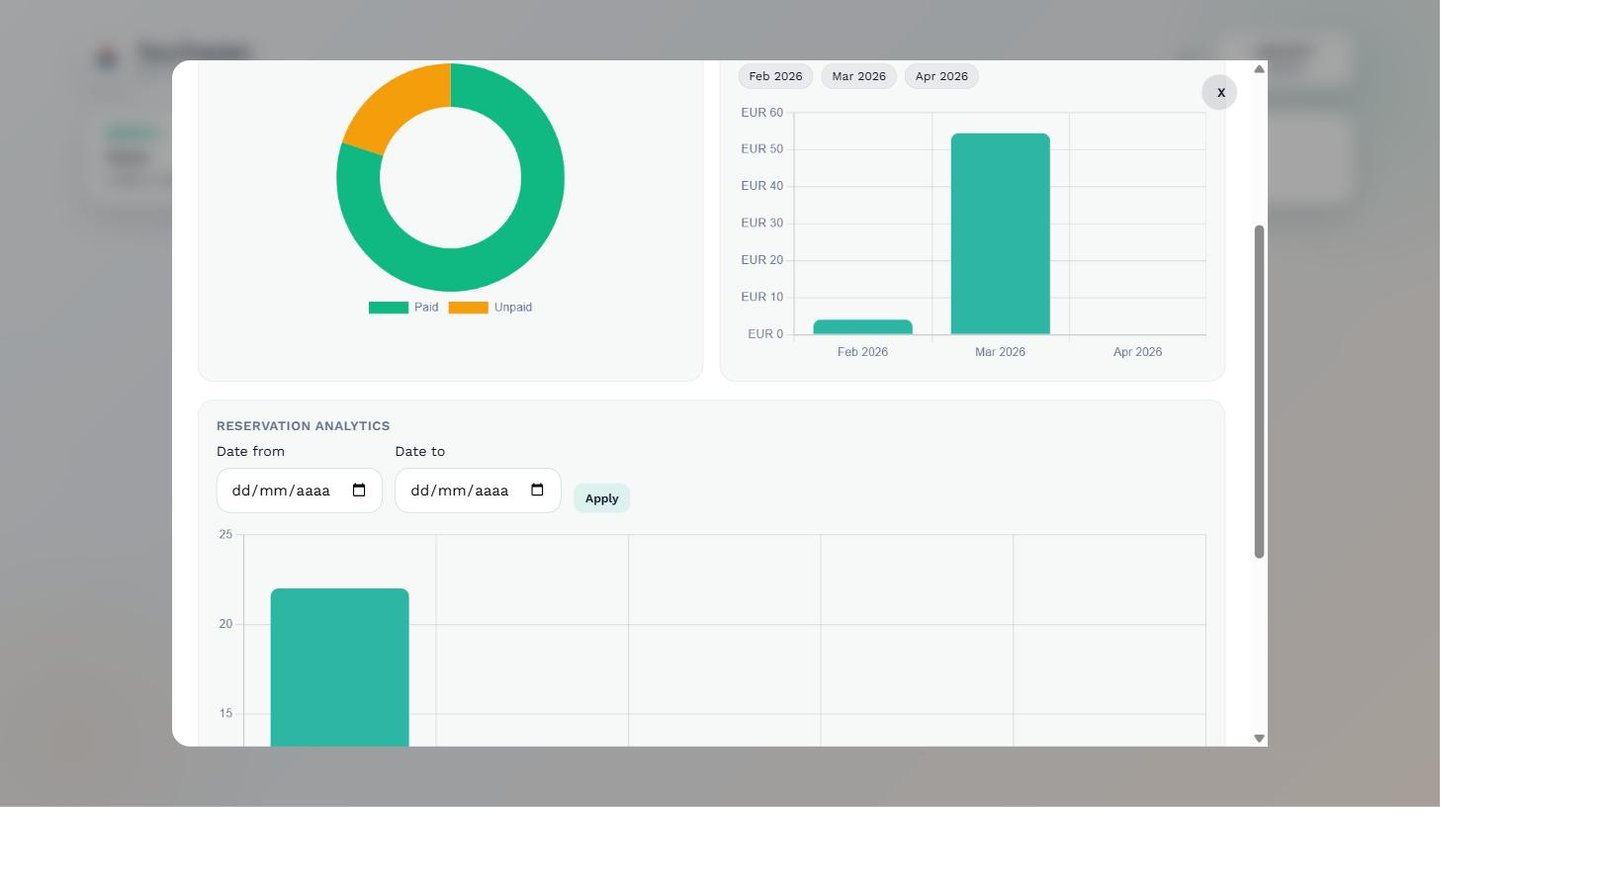
Insights tab with Paid vs Unpaid donut chart and Amount Due by Month bar chart
Insights — top section. Left: Paid vs Unpaid donut chart. Right: Amount Due by Month bar chart. Click the month pills (Feb 2026, Mar 2026, Apr 2026) to filter which months appear in the bar chart.
Reservation Analytics chart below the main insights charts
Insights — Reservation Analytics section. Select a custom date range and click Apply to view a bar chart of reservations by status for that period.
ChartDescription
Paid vs UnpaidDonut chart showing the proportion of paid vs outstanding tours.
Amount Due by MonthBar chart of total amount owed per month. Filter by clicking month pills.
Reservation AnalyticsBar chart of reservation counts by status for a selected date range.

Settings

The Settings module is organised into three tabs: General, User Management and Incoming Emails.
Settings General tab
Settings — General tab. Three sub-tabs: General (profile and rates), User Management (guide accounts) and Incoming Emails (import sources).

General tab — Profile & Rates

FieldDescriptionDefault
UsernameLogin username for the account.
EmailEmail address for the user.
Adult Rate (EUR)Global payment per adult participant.€4.00
Child Rate (EUR)Global payment per child participant.€1.50
Receive emailsToggle automatic email notifications for tour assignments.On

Incoming Emails tab — Import Sources

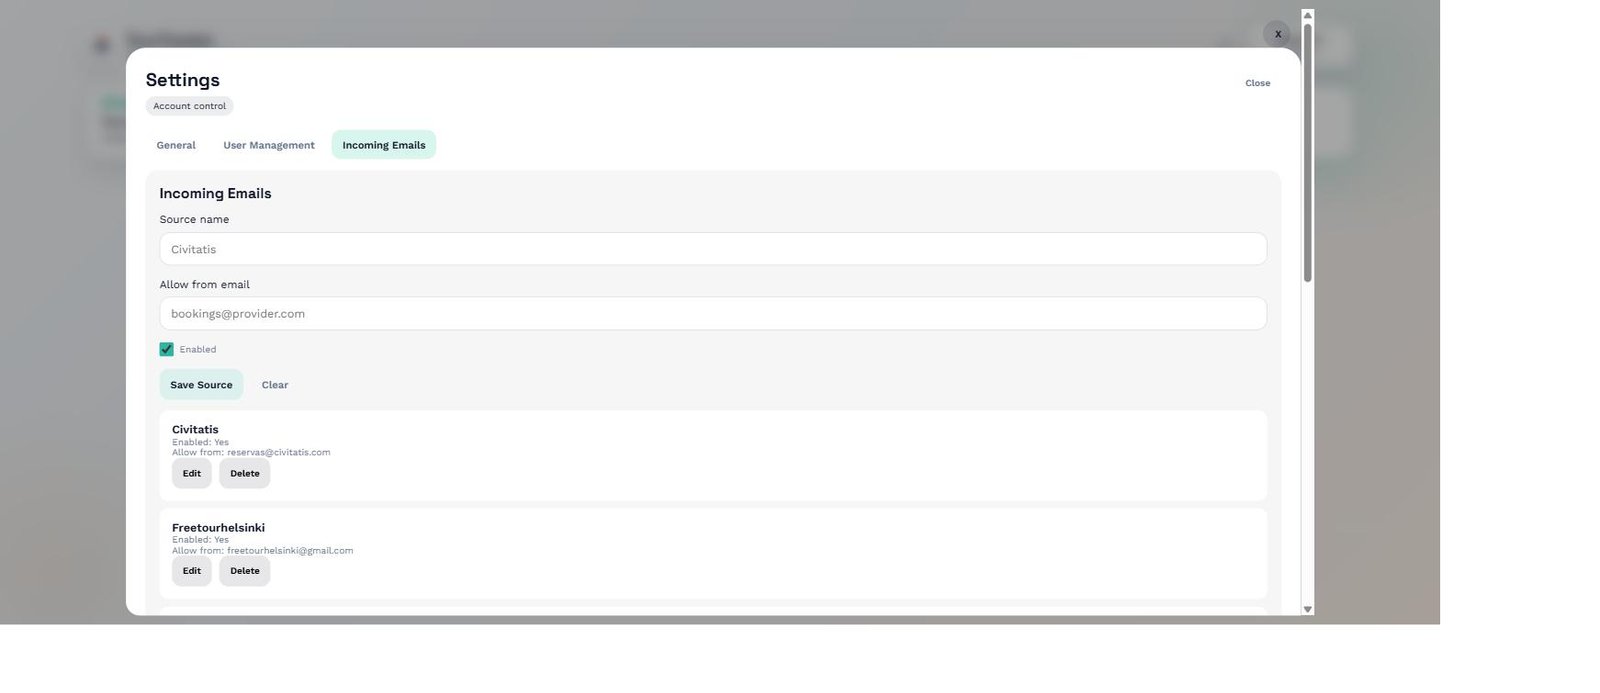
Incoming Emails settings with source list
Incoming Emails — configure the email address or domain each booking platform sends confirmations from. Sources can be enabled/disabled without deleting them.
FieldDescription
Source nameFriendly name for the source (e.g. "Civitatis", "Freetourhelsinki").
Allow from emailThe email address or domain authorised to send booking confirmations.
EnabledToggle to activate/deactivate this source without deleting it.

4 Customer Portal

The customer portal is a separate interface where the subscriber manages their plan, views usage metrics and handles their subscription. It is distinct from the admin dashboard.

Access & Navigation

1
Go to the Tour Tracker website and click "Login" in the navigation bar.
2
Enter your email address and password (the ones used during registration).
3
Click "Sign In". You'll be taken directly to the customer dashboard.
ℹ️
The customer portal uses your email address to log in. The admin dashboard uses your username. These are two separate access points.

Metrics & Statistics

MetricDescription
Reservations This MonthReservations processed in the current month, with a progress bar showing % of limit used.
GuidesTotal guides and how many are currently active.
Total EarnedEarnings from completed tours. Defaults to current month; filterable by date range.
Amount OwedPending payments to guides.

To filter earnings by a custom date range, click "Filter dates", set a From and To date, and click "Apply". Click "Current month" to reset.

Account Status & Subscription Management

ActionDescription
Access Your Tour TrackerDirect link to your subdomain. Visible only when the account is active and subdomain configured.
Upgrade PlanOpens the Stripe billing portal to change your plan. Changes take effect at the next billing cycle.
Cancel SubscriptionRequests cancellation. Access continues until the end of the current paid period.
⚠️
When you cancel, access remains active until the end of the billing period. Data is not deleted automatically. Contact support if you need to export your data before cancellation.

5 Limits & Alerts

Each plan has a monthly reservation limit. This section explains what happens as you approach or exceed that limit.

PlanMonthly limitVisual indicator
Starter / Trial 150 reservations
90 / 150 (60%)
Enthusiast 600 reservations
480 / 600 (80%)
Advanced 1,000 reservations
970 / 1000 (97%)
75%
The progress bar turns yellow. Plan to upgrade soon.
90%
The bar turns red. You receive an email notification warning you that you're approaching your limit.
100%
New reservations continue to be imported but you'll be prompted to upgrade. Tour Tracker never blocks or deletes your data.
🔴
Continuously exceeding your limit may result in temporary suspension of automatic import. Upgrade your plan before reaching 100% to avoid any disruption.

How to Change Your Plan

1
Log in to the Customer Portal on the Tour Tracker website.
2
Click "Upgrade Plan". The Stripe billing portal will open.
3
Select your new plan. The new limit applies from the start of the next billing cycle.

6 FAQ

Answers to the most common questions about Tour Tracker.

How does the email auto-import work?
You connect a dedicated inbox (e.g. reservations@yourcompany.com) to Tour Tracker. The system monitors it automatically and uses AI to extract reservation details — date, time, group size, tour type and customer info — from booking confirmation emails. No manual data entry required.
Which booking platforms are supported?
Tour Tracker works with any platform that sends booking confirmation emails, including GetYourGuide, Viator, Civitatis and direct bookings. The AI parser adapts automatically to different email formats.
How long does the initial setup take?
After subscribing, the Tour Tracker team typically sets up your instance within 24–48 hours. You'll receive an email with your subdomain URL and login credentials. Connecting your email inbox takes about 5 minutes.
Can I change my plan at any time?
Yes. You can upgrade or downgrade at any time from the customer portal. Changes take effect at the start of the next billing cycle. You can also cancel at any time with no penalties; access continues until the end of the paid period.
Is my data secure?
Each client gets their own isolated instance on a dedicated subdomain with SSL encryption, secure sessions, encrypted passwords and regular backups. Your data is never shared with third parties.
What happens if I exceed my reservation limit?
You'll receive a notification as you approach the limit. If you exceed it, new reservations will still be imported but you'll be prompted to upgrade. Tour Tracker never deletes or blocks your data.
Do guides need their own accounts?
No. Guides are managed from the admin dashboard and log in with the credentials the admin provides. They don't need separate subscriptions or independent accounts.
How is guide payment calculated?
Automatically: (Adults × adult rate) + (Children × child rate). Rates are configured in Settings. Only participants marked as present are counted. Each guide can also have individual rates set independently.
What payment methods do you accept?
All major credit and debit cards through Stripe, including Visa, Mastercard and American Express. Tour Tracker never stores your card details.
Can I save a tour mid-creation and finish it later?
Yes. If you leave the Tours module with unsaved changes, the system offers to save a local draft. When you return, a prompt will ask whether to restore it. You can discard it at any time with "Clear draft".

7 Glossary

Definitions of key terms used throughout Tour Tracker.

Reservation
A booking record created by a customer through a platform or directly. Contains customer data, tour date/time, participant count and a booking reference.
Tour
A scheduled tour activity on a specific date and time, with an assigned guide and a confirmed participant list.
Guide
A system user with the guide role. Can view assigned tours, confirm attendance and record participants. Cannot manage reservations or system configuration.
Admin
A user with full system access. Manages reservations, tours, guides, statistics and settings. Typically the tour operator who owns the account.
Auto-import
The process by which the system automatically extracts reservation data from incoming booking confirmation emails using AI.
Import source
A booking platform or email sender configured as an authorised origin for reservation imports (e.g. GetYourGuide, Viator, Civitatis).
Tour splitting
A feature that divides an oversized tour into multiple sub-tours, each assigned to a different guide.
Amount due
The amount the operator owes the guide for a completed tour, calculated automatically from configured rates and present participants.
Tour draft
A temporary local save of a tour in progress, allowing the operator to resume editing in a later session.
Subdomain
The personalised URL assigned to each Tour Tracker client for accessing their admin dashboard (e.g. mycompany.tourtracker.me).
Customer Portal
The web interface where the subscriber manages their plan, views usage metrics and handles their subscription. Separate from the admin dashboard.
Admin Dashboard
The main operational panel accessed via the client's subdomain. Contains the Tours, Statistics, Reservations and Settings modules.
CSV
Comma-separated values file format. Tour Tracker exports reports in CSV, compatible with Excel, Google Sheets and accounting tools.
Stripe
The payment platform used by Tour Tracker to process subscription billing. Tour Tracker never stores card data.
Booking reference
A unique code assigned by the booking platform (e.g. GetYourGuide order number) that uniquely identifies each reservation.
Participant
A person included in a tour (adult or child). Only participants marked as "present" are counted in payment calculations.
Grace period
A transitional period after a subscription expires during which access is temporarily maintained. Requires updating the payment or plan to continue.
Insights
The advanced data visualisation panel within Statistics (admin only), showing earnings and reservation charts by period.
Need more help?

Contact the Tour Tracker team via the contact form on the official website. Enthusiast and Advanced plans include priority and dedicated support respectively.